Poradnik NVIDIA NVENC OBS
ZALECANE USTAWIENIA
To są nasze zalecane ustawienia dla OBS Studio 23.0 i nowszych. Przetestuj te ustawienia i dostosuj je poprzez funkcję nagrywania na dysk aby sprawdzić czy będziesz zadowolony z wyników.
Aby uzyskać dostęp do ustawień, kliknij przycisk Ustawienia w prawym dolnym rogu.
ZAKŁADKA OBRAZ
- Rozdzielczość bazowa (obraz): Ustaw rozdzielczość, w której zwykle grasz. To znaczy rozdzielczość twojego pulpitu (jeśli grasz w trybie bez obramowania) lub rozdzielczość gry, którą zwykle wprowadzasz (jeśli grasz na pełnym ekranie).
- Rozdzielczość wynikowa (skalowana): Wprowadź rozdzielczość odpowiednią dla szybkości wysyłania i szybkości transmisji, jak omówiliśmy w poprzedniej sekcji.
- Filtr skalujący: Pozwala to wybrać filtr skalujący który zapewni niewielkie ulepszenie ostrości obrazu, kosztem pewnego obciążenia kodera. NVENC jest bardzo wydajny i zwykle działa przy niskim wykorzystaniu, dlatego zalecamy używanie tego z opcją Lanczos, 36 próbek, aby uzyskać najlepszą jakość.
- FPS: Wprowadź FPS odpowiednią dla twojej szybkości wysyłania i szybkości transmisji, jak omówiliśmy w poprzedniej sekcji.
ZAKŁADKA WYJŚCIE
Jeśli chcesz mieć prostą konfigurację tego typu jak "po wyjęciu z pudełka", wykonaj następujące czynności:
- Tryb wyjścia: Proste
- Streaming:
- Bitrate obrazu: Wprowadź szybkość transmisji odpowiednią dla twojej szybkości wysyłania, jak omówiliśmy w poprzedniej sekcji.
- Encoder: Wybierz: Sprzętowy (NVENC).
- Włącz zaawansowane ustawienia enkodera: Niezaznaczone. Współpracowaliśmy z OBS, aby dostroić te ustawienia, więc to po prostu działa!
- Ustawienia enkodera: Jakość. jest to już opcją domyślną. Zwróć uwagę, że jest widoczny tylko wtedy, gdy zaznaczysz Encode Advanced Encoder.
- Nagrywanie:
- Ścieżka Pliku: To jest katalog, w którym będą zapisywane filmy. Upewnij się, że wybrany dysk twardy ma wystarczająco dużo miejsca!
- Jakość nagrywania: Wysoka jakość zazwyczaj działa dla większości użytkowników, ale możesz zmienić tę opcję na jakość nie do odróżnienia, jeśli masz wystarczająco dużo miejsca na dysku lub zamierzasz nagrywać krótkie filmy (około 60 sekund).
- Format nagrywania: FLV lub MKV.
- Encoder: Sprzętowy (NVENC).
INNE USTAWIENIA
Są jeszcze 2 inne rzeczy, które chcesz skonfigurować, aby zapewnić płynny strumień:
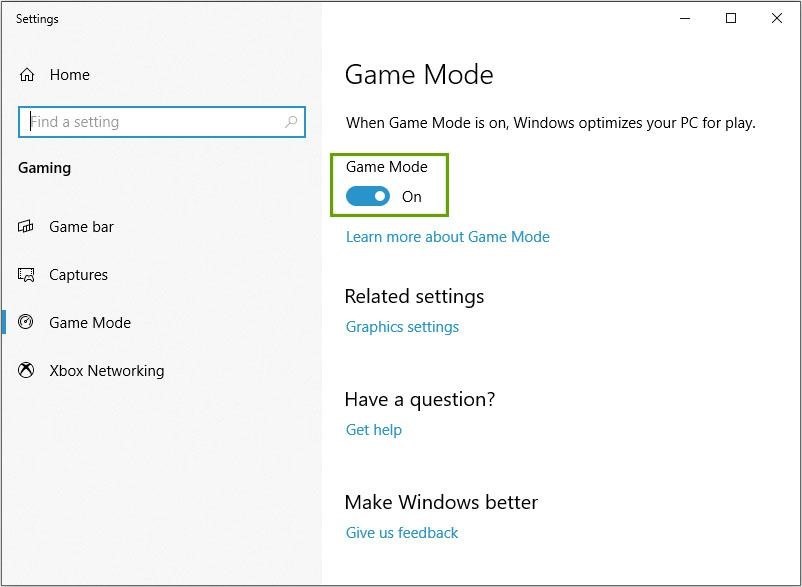
- Windows: Upewnij się, że zaktualizowałeś system Windows 10 w wersji 1903 i włącz Tryb Gry. Ta wersja zawiera ulepszenia wydajności przesyłania strumieniowego, a także zaktualizowany tryb gry zgodny z przesyłaniem strumieniowym.
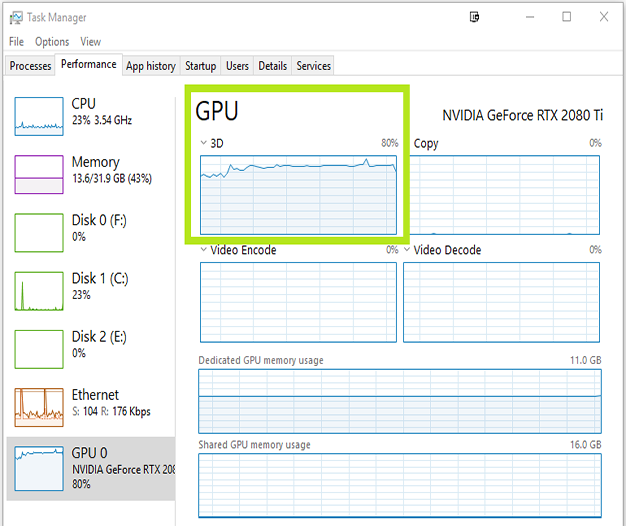
- Wykorzystanie GPU: Jeśli wykorzystanie GPU przekracza 95%, system Windows zacznie priorytetyzować grę ponad wszystko; w niektórych przypadkach może to spowodować lagi w transmisji. Aby rozwiązać ten problem, OBS dodał opcję w OBS 24.0.3, aby nadać OBS Studio priorytet nad Grą. Po prostu uruchom OBS jako administrator, a Twój strumień będzie jedwabiście gładki.
Jeśli z jakiegoś powodu nie chcesz uruchamiać OBS w trybie administratora, możesz również ograniczyć wykorzystanie GPU do wartości poniżej progu 95%. Aby to zrobić, możesz:
- Ogranicz liczbę klatek na sekundę w grze, uruchom grę w trybie okienkowym bez obramowania, zmniejsz grafikę lub rozdzielczość gry albo włącz synchronizację pionową.
- Uruchom wszystkie zasoby w rozdzielczości 1080p. Aby to zrobić, kliknij dwukrotnie źródło w OBS i pod Rozdzielczością wybierz Niestandardowe i określ rozdzielczość równą lub mniejszą niż 1080p.
I oto masz! Mamy nadzieję, że pomoże Ci to poprawić jakość strumienia i osiągnąć swoje cele. Miłego streamowania!
ZAAWANSOWANE USTAWIENIA
Jeśli chcesz pobawić się wszystkimi ustawieniami, oto nasze szczegółowe zalecenia.
Ustawienia strumieniowania
- Tryb wyjścia: Zaawansowany. Daje to dostęp do wszystkich ustawień. Zaczynajmy!
- Enkoder: Wybierz NVIDIA NVENC H.264 (new).
- Enforce Streaming Service Encoder Settings: Leave this checked, this will ensure that if you enter a wrong value by mistake it gets corrected.
- Rate Control: Select CBR. This determines the rate at which frames are going to be encoded.
- Bitrate: Enter the bitrate appropriate for your Upload Speed, as we discussed in the previous section. Keep in mind that some platforms have a maximum bitrate (i.e. for Twitch it’s currently 6000 Kbps.).
- Keyframe Interval: Set to 2. Streaming platforms may limit what you can select here, and most require a setting of 2.
- Preset: Select Quality. You can change this to Max Quality to enable 2-pass encoding; this will provide you a minor quality increase but may cause problems in limited situations in maxed out GPUs.
- Profile: Set to High. Profile determines a group of settings in the H.264 Codec. It doesn’t impact performance and gives access to a set of features that are key to streaming, so this should always be set to High.
- Look-ahead: Checked. This allows the encoder to dynamically select the number of B-Frames, between 0 and the number of B-Frames you specify. B-frames are great because they increase image quality, but they consume a lot of your available bitrate, so they reduce quality on high motion content. Look-ahead enables the best of both worlds. This feature is CUDA accelerated; toggle this off if your GPU utilization is high to ensure a smooth stream.
- Psycho Visual Tuning: Checked. This enables the Rate Distortion Optimization in the encoder, which greatly optimizes the way you use bitrate, improving image quality on movement.
- GPU: 0. If you have 2 GPUs in your system, you can select which one is used to encode. This is not recommended, as NVENC is already very efficient and the little gain you can get from using a second card is lost by having to copy the frame to the second GPU.
- Max B-Frames: Set to 4. If you uncheck the
Look-ahead option, reduce this to 2 B-Frames.
Recording Settings
- Type: Standard.
- Recording Path: This is the directory where the videos will be saved. Make sure the hard drive you select has enough space!
- Recording Format: FLV; or MKV if you use multiple audio tracks.
- Audio Track: Leave it at 1 for default; you can add more audio tracks if you are using more sources.
- Encoder: NVIDIA NVENC H.264 (new).
- Rate Control: We recommend CQP, although VBR will also produce good
results.
- CQ Level (CQ): 15 (you can decrease the number to get higher quality).
- Bitrate and Max Bitrate (VBR): 40,000 Bitrate; 60,000 Max bitrate. You can increase these to 100,000 and 200,000 (respectively) for higher quality.
- Keyframe Interval: 0 or 2.
- Preset: Select Quality. You can change this to Max-Quality to enable 2-pass encoding; this will provide you a minor quality increase but may cause problems in limited situations in maxed out GPUs.
- Profile: Set to High.
- Look-ahead: Checked.
- Psycho Visual Tuning: Checked.
- GPU: 0. If you have 2 GPUs in your system, you can select which one is used to encode.
- Max B-Frames: Set to 4. If you uncheck the Look-ahead option, reduce this to 2 B-Frames.
ABOUT THE GEFORCE-OPTIMIZED NEW VERSION OF OBS STUDIO
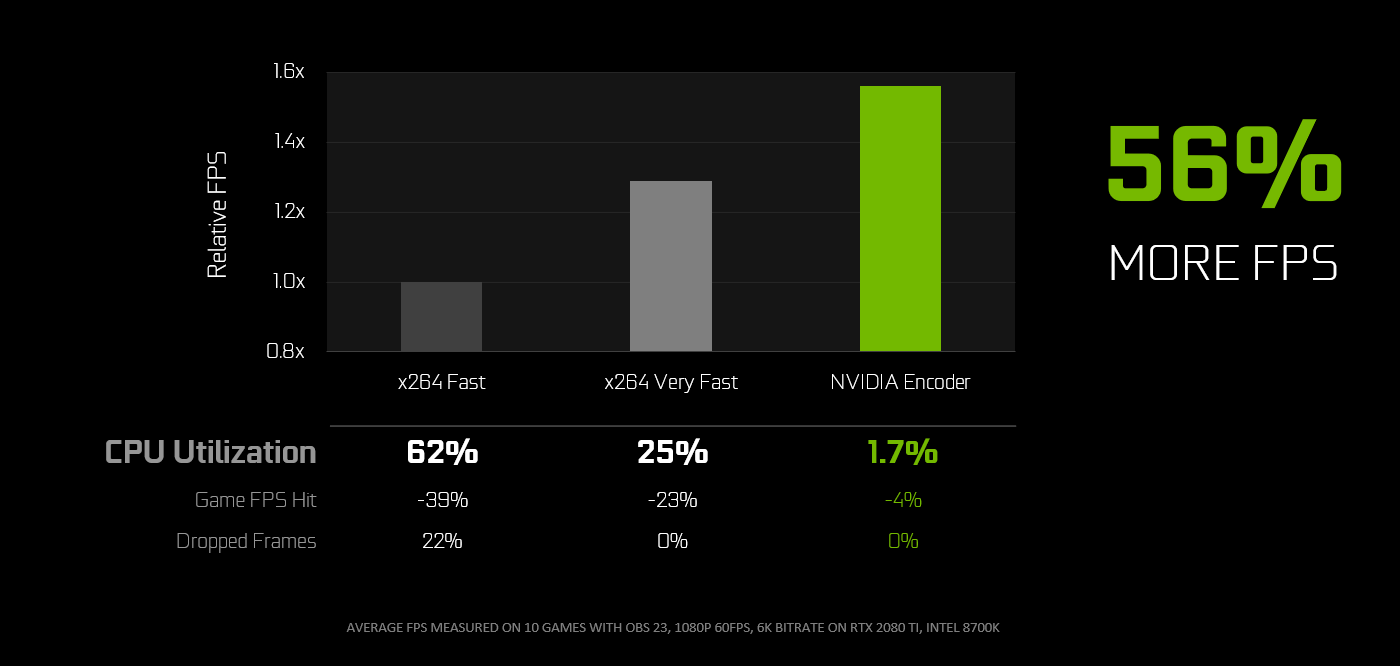
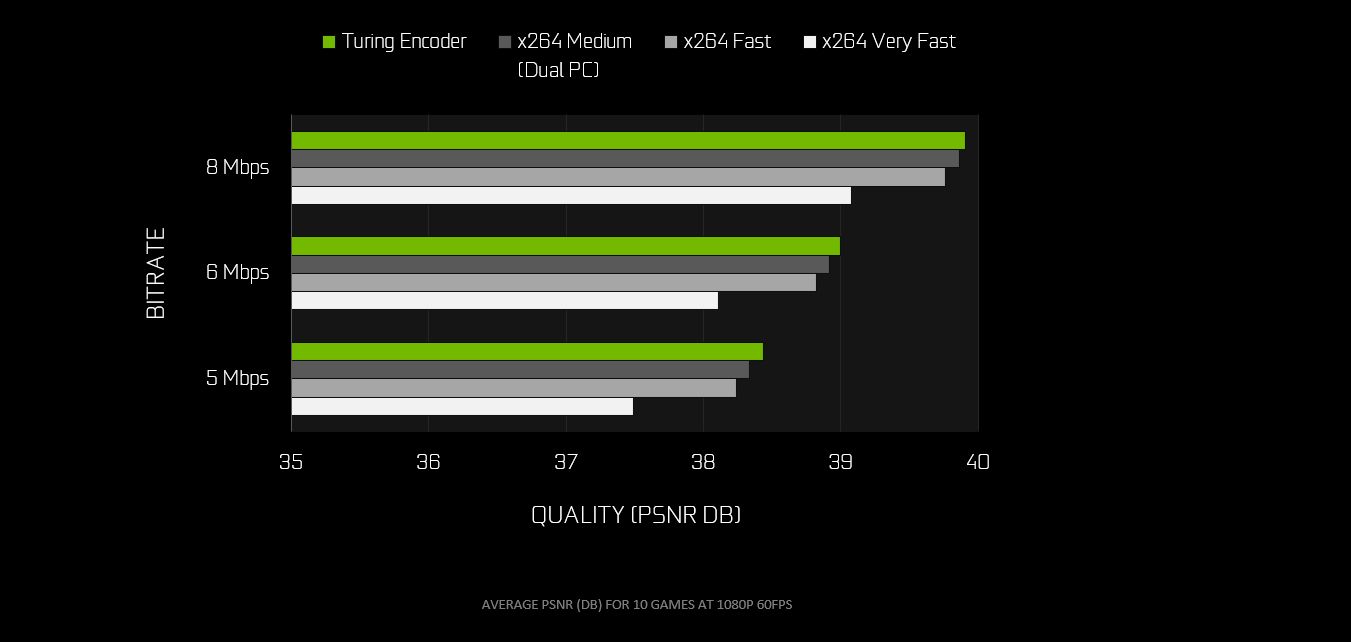
We have collaborated with OBS to improve support for NVIDIA GeForce GPUs. The new OBS Studio, version 23.0, will leverage the NVIDIA Video Codec SDK, which will greatly improve performance and reduce the FPS impact of streaming and recording. We have also tweaked some of the background settings of NVENC to improve quality, especially for the RTX 20-Series GPUs.
HOW TO DEBUG PROBLEMS
Streaming can be very complicated, but it’s particularly hard to debug. There are many things at play when you stream, so we are going to try to provide you some help on how to identify what is going wrong and how to fix it.
Components
Streaming uses the following components:
- Your PC: This includes hardware and software.
- Local Internet: WiFi or cabled internet + your Router.
- Your connection: To your service provider.
- The platform: Twitch, Youtube, Facebook
Gaming, etc.
- Viewer’s Internet: Typically Wi-Fi, but can also be 3G/4G.
- Viewer’s device: keep in mind 35% of Twitch viewers are on mobile.
If something is failing, we want to first identify what component may be failing, so we don’t go crazy trying to fix something that was never broken in the first place. Typically, this means that the first test you should do is a Speed Test to make sure that you don’t have internet problems in your local internet or your connection. Second, make sure the platform hasn’t issued an alert that they are down or are experiencing problems. Then based on what error you get, you start looking at one thing or another in your PC.
How to check what’s happening to the encode
OBS Studio includes a very useful tool: the Stats Window. To bring it up, click on View > Stats. This window will show you Lagged and Skipped frames, Dropped frames, and Encode FPS.
This window will show you:
- FPS at which you are encoding.
- Latency to encode each frame.
- Missed Frames - problems with GPU.
- Skipped Frames - problems with CPU.
- Dropped Frames - problems with network.
Common Error Types
Stream is missing FPS. The stats window will show missed frames. While streaming and missing frames, pull up the Task Manager > Performance, Click on GPU and check the 3D load and Encoder load.
Solutions:
- If the 3D load is above 95%, especially at 1440p or 4K setups, Windows may be prioritizing the Game over OBS. To fix this, we have a special mode inserted on OBS 24.0.3 where you can prioritize OBS above the Game. Just run OBS in Game Mode.
- If the Video Encode load is maxed out, we need to lower the load. NVENC can do up to 8K30, so the only way to overload it is to do 2x4K60 streams. If you are encoding 4K60, make sure that your quality setting in OBS is set to Quality, not Max Quality. Max Quality does 2 pass encoding (i.e. encodes twice), which is too much for the encoder.
Image looks very washed out. The most likely issue is trying to push too much quality with not enough bitrate. Consider reducing the resolution, and frame rate (if needed), and try again. If quality improves, then adjust until you find your sweet spot.
